| ||||||||||
|
The main window

2. The resize knob lets you resize the window.
3. The capture button creates the screen capture. If you have a default directory set up (below) the image will be saved there. Otherwise you will be presented with a file save dialog.
4. The hide button hides the window. You can reenable it by double clicking on the system tray icon.
The system tray options
System Tray Icon : ![]()
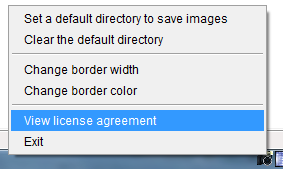
By right clicking on the system tray icon you gain acces to the program options.

1. The Set a default directory to save images option will display a folder dialog that will allow you to set a directory to automatically save images without a file save dialog. If this is enabled then the images will have a default name of "imgX.png" where "X" is an incrementing number.
2. The Clear the default directory option will clear the directory saved in the previous option. In this case after you press the capture button, a file save dialog will appear that will allow you to save the image.
3. The Change border width option will allow you to change the width of the window border. If you select this, a dialog with a slider will be displayed that will allow you to set the width.
4. The Change border color option will allow you to change the color of the window border. If you select this, a dialog with a color selector will be displayed.
5. The View license agreement option will display the license ageement dialog. 6. The Exit option will exit the program.